

The loan calculator helps you and your customer understand affordability and eligibility in seconds — so the conversation is grounded in real numbers instead of guesswork. You can run a quick sum on the spot, or build a saved calculation with several options and compare them side by side in front of the customer.
Two ways to use it
- The quick calculator — open it from the calculator button in the top bar, next to the notification bell, anywhere in the app. Good for answering “roughly what can I afford?” while you're still on the phone. Opened this way it isn't attached to anyone and nothing is kept. The basic view is available on every plan; the extra tabs and tools described below need Pro.
- A saved calculation — created from the Calculation module, or from a lead's row on the leads list. This is the one you build up over time, attach to the customer, and revisit before a meeting. Opening the calculator from a lead also lets you push what you've just worked out into that lead's calculation.
Who you're calculating for
A calculation starts with the customer: their income and any existing commitments such as a car loan, PTPTN or ASB. Add a second customer when a purchase involves a joint applicant, so both incomes and commitments are counted. Only customers marked active count toward income and commitments.
Options
An option is one scenario — one combination of price, tenure, interest rate and loan coverage. Most deals are worth modelling two or three ways, which is why a calculation can hold several.
Adding an option
Click Add Option and fill in the form. As you type, the panel at the top shows the most this buyer can afford — and while something is still missing, it names the fields it's waiting for instead of just sitting there greyed out. When the figure appears, the button next to it creates the option at that price, so you don't have to work backwards from a property price yourself.
Income and commitments are filled in for you from the customers you already added, and the tenure, loan coverage and interest rate start at sensible values you can change.
Eligible, partial, or not eligible
Every option carries one of three verdicts, shown as a colour so it's readable at a glance:
- Eligible — the loan fits both of the checks the bank cares about.
- Partial — it passes one and fails the other. Usually worth adjusting rather than abandoning: a longer tenure or a lower price often turns it around.
- Not eligible — it fails both.
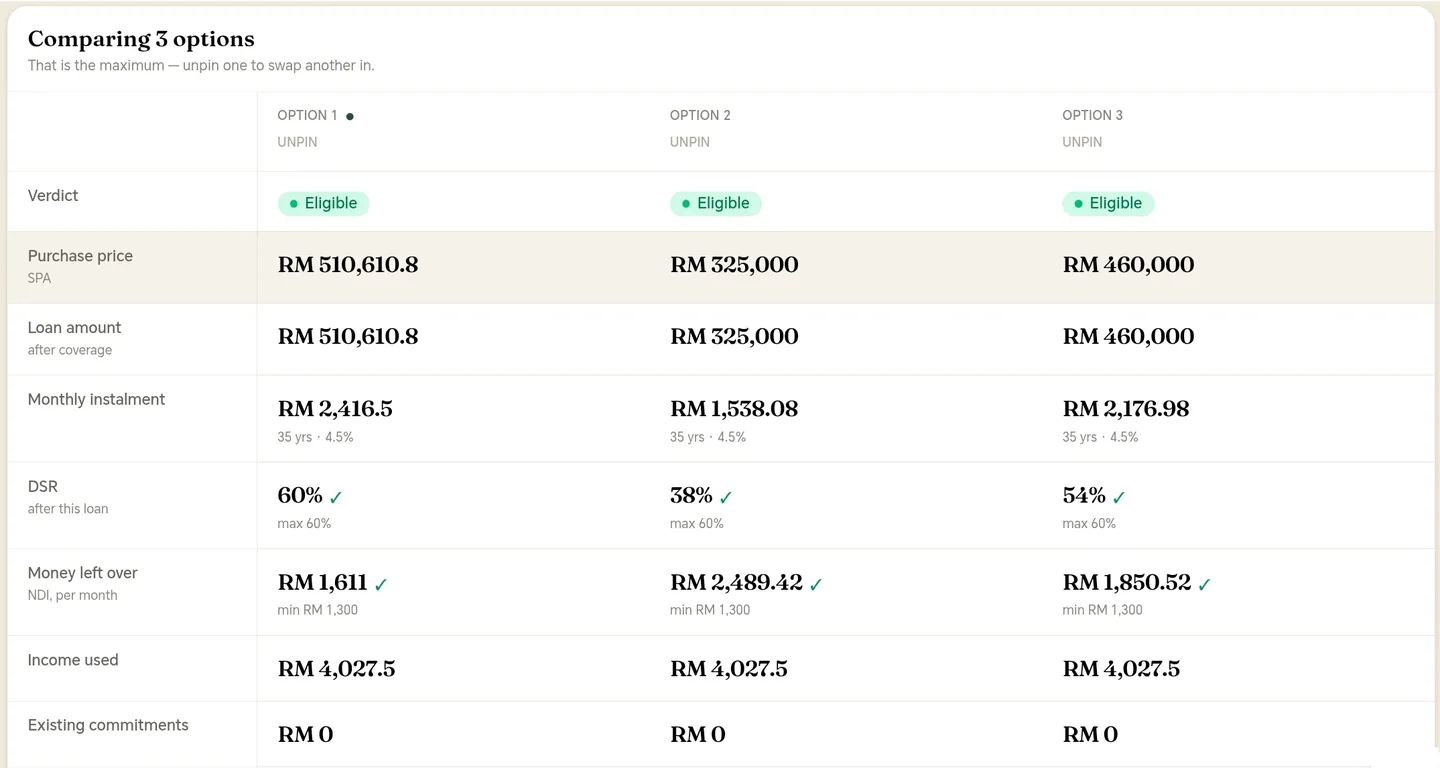
Two figures drive that verdict and both are shown on the option: DSR, how much of the customer's income would go to loan repayments, and money left over, what remains each month once the new instalment is paid. Each is marked with a tick or a cross against the limit you set, so you can see which one is the problem.
Reading an option
Set an option as active and its full result appears beside the option list — below it on a phone: the purchase price, the monthly instalment, and the two figures above.
Every card also opens up. All figures and Record are always there — the complete set of numbers, and who created or last changed the option. Three more appear when they apply: Affordability breakdown on options that aren't the active one, Upfront costs once you've added estimated expenses, and Currency when the option isn't in ringgit.
Comparing options side by side
Pin an option — the pin sits at the top of its card — and pin a second to put them next to each other. You can compare up to three. The comparison lays the options out as columns and the figures as rows, so you're reading straight across: verdict, purchase price, loan amount, monthly instalment, and the rest.
Unpin any option to swap another in. What you pin is only for this conversation — it isn't saved with the calculation.
Presentation mode
When you're sitting with the customer, Presentation mode fills the screen with just the comparison — bigger figures, and every edit control removed so nothing can be changed by accident when you turn the laptop around. Press Esc or Exit to come back.
Part of the Eligibility Snapshot + Presentation add-on.
Working in another currency
If your customer earns overseas — a lead working in Singapore, for example — pick their currency on the option and enter the income as they earn it. The exchange rate and its date are filled in for you and stay visible, so you can tell the customer exactly what rate their figure was based on. You can also set how much of that income to count.
Sending a result to your customer
In the quick calculator, once you have a result, the badge button in its toolbar opens the Eligibility Snapshot — a single card you can download as an image, either a still picture or a short animation, and send on to your customer yourself. It's the same numbers you've been looking at, in a form that survives being forwarded.
This one lives in the quick calculator rather than on a saved option — for a saved calculation, use Presentation mode above.
Part of the Eligibility Snapshot + Presentation add-on.
Linking it to a lead
A calculation can be attached to a lead, so the numbers live alongside the rest of that customer's history and anyone picking the lead up can see what was already worked out.
Good to know
The calculator is a guide to help you advise customers — the final decision always rests with the bank. Use it to shortlist options, set expectations early, and show the customer why one choice suits them better than another.